Timeline
The Timeline is an useful tool for managing layers with a time dimension.
It makes possible to observe the layers' evolution over time, to inspect the layer configuration at a specific time instant (or in a time range) and to view different layer configurations time by time dynamically through animations.
Warning
Timeline actually works only with WMTS-Multidim extension (WMS time in capabilities is not fully supported). From now on, the layers that the Timeline can manage will be addressed as time layers.
When you load time layers the Timeline panel becomes automatically visible and allows you to take a look at the main functionalities.

Timeline histogram
The Timeline panel can be expanded through the Expand time slider button  . By clicking it another section appears under the main panel.

The time layers' list, on the left, can be shown/hidden by clicking the Show/Hide layers names button  .
Once a layer is loaded, a new row is added in the list and its relative histogram appears in the right side.
.
Once a layer is loaded, a new row is added in the list and its relative histogram appears in the right side.
The histogram shows the layers' data for each time in which they are defined. You can zoom on the histogram, scroll the time axis and drag the current time cursor along it.
Handling the time
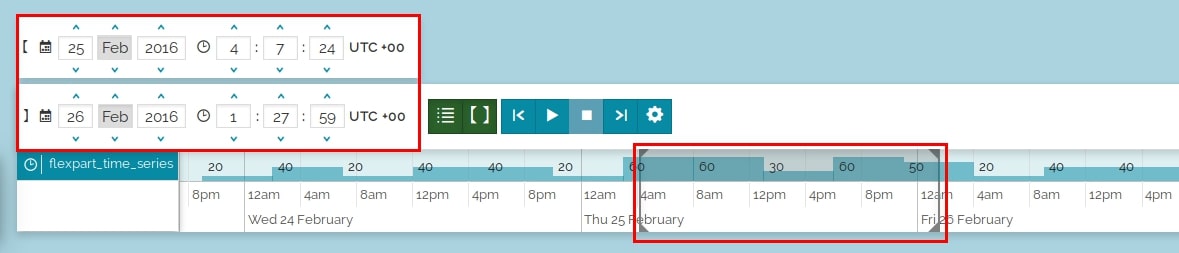
In the left side of the main panel there are some control cells in which you can set the date/time of interest and watch the layers' configurations at that specific instant.

The current time cursor changes its position according to the selected date and viceversa: when you drag that cursor along the time axis the date/time cells will update their values.
Note
The highlighted layer in the time layers' list drives the time management, from now on it will be addressed as guide layer (See the Animation Settings > Timeline Settings > Snap to guide layer option). When you move the current time cursor to a time value for which no data are available the cursor is snapped to the closest time with data.
If you want to observe the layers in a finite fixed time interval you can set a time range by clicking the Enable time range button  . This will opens an extra panel with date/time control cells so you can set the range limits either by directly entering values in those cells or by dragging the limits cursors along the histogram time axis.
Animations
Animations are based on ordered sequences of steps, by default each step represents a configuration of the selected layer (guide layer).
The right side of the main panel contains the buttons responsible for managing the animations.

The following list describes the functions performed by each button.
- Step backward
 : return to the previous step
 - Play
 : play the animation
 - Stop
 : stop the animation
 - Step forward
 : go ahead to the next step
 - Settings
 : open the Animation Settings panel
Clicking the Play button, by default, the current time cursor reach the initial time of the guide layer and the animation starts. You will see the layers' configurations changes on the map and the time progress on the histogram. Following the step sequence, the cursor will shift each time to the next step in a certain time interval, the frame duration.
The Stop button obviously stops the animation and the current time cursor remains in the last position reached.
The Step backward or the Step forward buttons allow you to statically change the current time, so by clicking on one of them the cursor changes its position (to the previous or the next step) on the histogram and the date/time values of the control cells will be update accordingly.
You can pause the animation with the Pause button  .
.
You can also specify a time range. During the animation, the whole range will be shifted step by step along the time axis and in each step the layers' configurations will be consider the total amount of data in that range.

Animation Settings
The animation behavior can be customized through the Settings. If you click on the button a panel with two different sections appears.
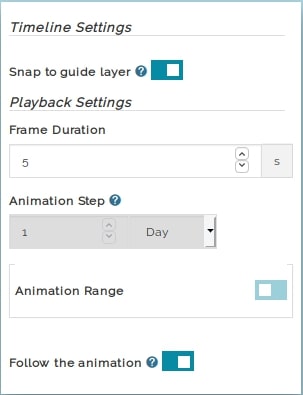
Timeline Settings
- Snap to guide layer: this option is active by default. It forces the time cursor to snap to the selected layer's data. Disabling this option the Animation Step selection in the Playback Settings section becomes available.
Playback Settings
- Frame Duration: it indicates how fast the time cursor switch to the next step in the steps sequence
- Animation Step: it defines the step width and so all the steps positions along the time axis. By default this option is disabled and the step sequence is defined by the guide layer's data. If activated, a fixed time unit (in terms of seconds, minutes, hours, days, months or years) can be defined as the step width and the whole steps sequence will be reconfigured.
-
Animation Range: if activated, it basically bounds the animation execution to a fixed time interval, the green range. The green range can be defined both dragging the play/stop cursors directly on the histogram or filling the date/time control cells of the extra panel displayed.
Other settings:- Zoom to the current playback range
 : zoom the histogram until it fits the animation's green range time extension.
 - Set to current view range
 : extend the animation's green range until it fits the current view range of the histogram.
 - Fit to selected layer's range
 : extend the animation's green range until it fits the guide layer time extension
- Zoom to the current playback range
-
Follow the animation: if activated the histogram is always centered on the time cursor during the animation.